This first part of the tutorial presents how to add a new detector using the nptool-wizard utility available in the nptool package. nptool-wizard is a simple bash script that will first ask you a few information about the detector you want to create and the author. It will then create the needed files in the NPLib and NPSimulation directories. These files correspond to the basic case of a scintillator detector (rectangular or cylindrical) where energy and time are recorded. For a more elaborated detector, it is recommended to first follow the present tutorial and then to go to the next one.
Running nptool-wizard
nptool-wizard is available as soon as you prepare the compilation of NPLib, i.e., after the cmake ./ command is issued. However, as a good practice, it is recommended to compile and install NPLib as a prerequisity.
Once this is done, you can call the nptool-wizard utility doing:
$ nptool-wizard
The script will prompt you to give a name to your new detector (say newDet as an example). Then it will ask your name and email which will be added in the header of each created file so that comunication between people maintaining the package is easier. If the detector name you have chosen already exist an error will be issued. This behaviour can be override using the -f flag, which will create the detector regardless to the preexisting detector files and folders.
nptool-wizard will also give a list of the files created and ask whether you want to add all these files to the Git repository. For the purpose of this tutorial, say no. If you say yes a git add command will be run on every newly created file, allowing for a fast and easy commit of your new detector.
Compilation of the newly created classes
In order to make your new detector fully supported and integrated in the nptool framework you need to compile again NPLib and NPSimulation. This can be achieved using the following list of commands:
$ npl
$ cmake ./
$ make -jn install
$ nps
$ cmake ./
$ make -jn install
Running a simulation
You should now start to work from your new detector project folder, accessible via the npp command:
$ npp newDet
Performing a basic Monte Carlo simulation of the recently added detector is as easy as running the following command line:
$ npsimulation -D newDet.detector -E alpha.source
where newDet.detector is created by the nptool-wizard utility. You can shoot 10 alpha particles with the following command line issued in the GEANT4 environment:
$ /run/beamOn 10
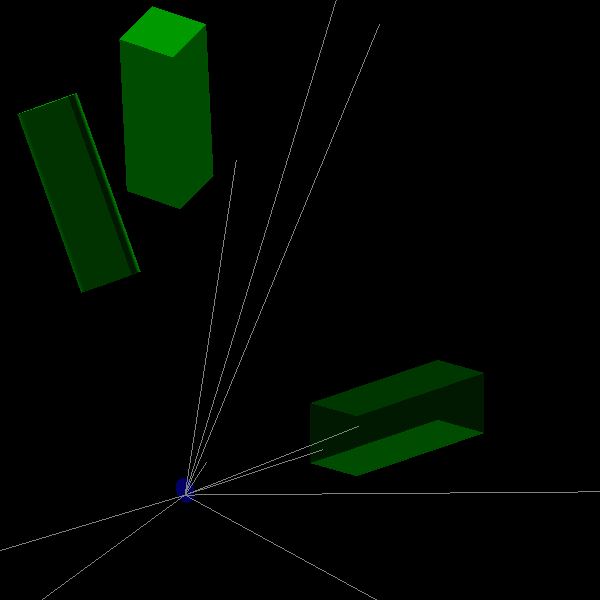
The setup is made of a target (blue disk) surrounded by three detectors (green), one cylindrical and two rectangular ones. The following Figure shows the setup with 10 alpha particles shot randomly.
Running a basic analysis
A basic analysis of the generated data can be performed using the npanalysis utility as follow:
$ npanalysis --last-sim -GH
A default output ROOT file (PhysicsTree.root) is created in the $NPTOOL/Outputs/Analysis directory. The –last-sim flag analyses the previous simulation while the -GH flag generates histograms defined in the TnewDetSpectra class.
The spectra are stored in the ControlSpectra/newDet/ directory of the PhysicsTree.root file. The newDet_ENERGY_TIME and newDet_ENERGY_CAL spectra show the energy v.s. time and energy information, respectively.